Inspection and control of steel barrel welding quality
Yang Wenliang
In recent years, although the technology of China's steel barrel industry has made great progress, the barrel making equipment has also made a lot of progress, but the quality control in the steel barrel production process is always a little powerless. For example, the seam welding process of steel drums is an important process to determine the quality of steel drums, but the process quality inspection in the process is difficult to implement. In most cases, the quality of the seam weld of the steel drum is checked by the airtightness test after the steel drum is assembled. At this time, the steel drum has been formed and the leakage defect is difficult to recover. Moreover, the pavilion often produces batches of non-conforming products, which cannot be detected in time, so they are discovered after molding. Sometimes the airtightness test is a qualified product, but it is often a problem in actual use. This is because the airtightness test can detect whether the steel drum leaks at that time, but it is difficult to find the potential quality problem inside the weld. The emergence of this kind of problem is mainly because the inherent quality of seam welding is difficult to test. Most enterprises still have no inspection methods. They can only be visually inspected by experience. Most of these tests are carried out by the operators themselves. Most manufacturers are not in the factory. A special inspector is set up in this process. Therefore, most of the product quality problems of steel drums in China occur on the welds. We should apply the advanced testing technology available at home and abroad to carry out quality inspection and control of steel barrel seam welding, in order to improve the overall quality of the steel drum, eliminate the seam welding quality problem in the initial state, and continuously improve the first pass rate of the steel drum.
First, the quality inspection of steel barrel seam welding
The inspection of seam quality of steel drum is an important part of steel barrel welding production, and is an indispensable means to ensure product quality and improve the qualification rate of steel drum. Before the welding of the steel drum and the welding process, the welding process parameters and the welding conditions are found in time by checking the process parameters and the quality of the weld, so that the corresponding technical and management measures can be taken to ensure the welding quality of the steel drum; After the steel drum is welded, the weld is non-destructive or a destructive test method is applied to the test piece to qualitatively or quantitatively evaluate the weld performance and defects to identify the quality of the weld.
In order to ensure the welding quality of the steel drum, all the links in the steel drum production process must be systematically inspected, such as the process design review of the steel drum, the process related to the seam welding and the process inspection and quality evaluation of the seam welding process, and seam welding. Inspection and identification of equipment, technical level examinations of welding operators, etc. Here, we mainly study the process inspection and quality assessment of the seam welding process.
Quality inspection of steel seam welding includes weld strength inspection, weld size inspection, size of internal and external defects of weld joints, and other special properties.
1. Inspection method and inspection content
There are many inspection methods for seam welding in steel drums. Several commonly used test methods and corresponding test contents are shown in Table 1.
Table 1 Inspection methods and inspection contents of common steel barrel seam welding
2. Weld size requirements
One of the main indicators for assessing the quality of seam welding is the nugget size. Generally, the requirements for the diameter of the weld nugget of the steel drum are:
D=4√δ ......(1)
Where d-weld joint fusion diameter (flank);
δ - sheet thickness (mm).
In the quality inspection of steel barrel seam welding, we specified the minimum nugget diameter of the solder joint (Table 2) and the minimum nugget height of the weld according to the thickness of the sheet. If it is lower than this value, the solder joint is considered unqualified.
Table 2 Minimum allowable melt diameter
Inspect the nugget size on the torn test piece, X-ray film or macroscopic metallographic test piece, measure the diameter (d) and height (H) with a low magnification magnifier or other tool, and press the measured nugget height Calculate the penetration rate (A) (see Figure 1).
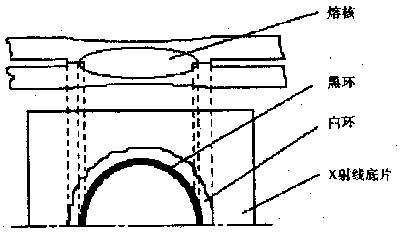
Figure 1 Macroscopic metallographic test and black ring on X-ray film
A = (h / δ) x 100% ...... (2)
Where h is the height of one side of the nugget (mm);
Δ——the measured thickness (mm) of the board.
The weld penetration requirements for welds of different thicknesses are different. If the penetration rate is too small and too large, it will affect the performance of the weld joint. Generally, the penetration rate is within the range of 20-80%.
3. Weld defect
Defects on the outside and inside of the joint are another important indicator for assessing the quality of the weld. Through the inspection methods listed in Table 1, the defects that can be found are: unfused and incomplete fusion, cracks, pores, shrinkage cavities, burns, burn through, deep indentations, etc., whether these defects are allowed to exist on the steel drum, Whether to allow repair is determined by the characteristics of the defect, the properties of the steel sheet material, and the conditions of use of the steel drum. There should be clear provisions in the welding quality inspection standards for steel drums.
1 unfused and not fully fused
Unfused and incompletely fused are one of the more serious defects. It directly affects the strength of the joint, so the limit is limited.
The unfused and incompletely fused inspection method is a macroscopic metallographic test method. At present, there is no effective and non-destructive testing method for seam welding; however, ultrasonic testing can be applied to the welded joint.
Unfused defects are manifested on macroscopic metallographic specimens that are invisible to the nugget or weld but are plastically bonded. The characteristic of the incompletely fused defect is that the solder joint is too small or fused to be eccentric, the length of the nugget forming the bonding surface is less than the specified value (Table 2) or only partially fused in the solder joint and the seam weld, and the portion is not fused. It is obvious that the joint having such a defect is low in strength.
For the defects that the steel barrel welds are not welded, it can be repaired by increasing the welding current and re-welding or welding.
2 crack
Cracks are one of the most dangerous defects. Especially when the steel drums are used poorly, it is more dangerous if there are external defects.
Cracks have internal cracks and external cracks. The macroscopic metallographic method is commonly used to check cracks. The crack has little effect on the static load strength of the welded joint, and has a significant effect on the dynamic load fatigue strength, especially the external crack. Generally speaking, there should be strict restrictions on cracks. Especially for steel drums for export packaging, external defects are generally not allowed, and the number of repairs allowed is also limited. For internal cracks whose length of the straight line is not more than 1/3 of the diameter of the nugget and which is not 15% of the nugget diameter around the nugget, a small number of solder joints are allowed, and the rest should be repaired.
The method of eliminating cracks is usually repaired by arc welding or argon arc welding.
3 pores and shrinkage holes
Porosity and shrinkage are common defects, and the metallographic examination method is commonly used to check the pores and shrinkage cavities.
If the pores and shrinkage cavities are accompanied by no cracks, there is no significant influence on the joint strength. In the quality inspection standards, the restrictions on the pores and the holes are not strict. Generally, pores smaller than 0.5 mm are not treated as defects, and a pore or shrinkage hole of less than mm is allowed in each of the solder joints.
It is not allowed that the pores and shrinkage cavities are too large or exist at the edges of the nugget or are accompanied by cracks. Generally, the method of arc welding or argon arc welding is used to repair the pores and shrinkage holes.
4 deep indentation
In the quality inspection standard, the depth of the indentation of the seam welding is generally specified to be less than 15% of the thickness of the sheet, and the maximum is not more than 20% to 300-/0. If it exceeds this specification, it is called an over-indentation as a seam weld defect. deal with.
Over-indentation is often measured on a macroscopic metallographic specimen using a tool ejector.
Excessive indentation has a certain influence on the strength of the weld. For a typical steel drum, the number of points allowed is 10% of the total number of welds. Over-indentation is often repaired by arc welding or argon arc welding.
5 surface burns
Surface burn is a common defect that does not affect the strength of the joint, but it affects the surface quality and corrosion resistance of the joint. In the production of steel drums, such defects are generally not subject to stricter requirements.
6 splashes
Splash is the most common type of defect. In steel drum production, slight splashing is allowed and not treated as a defect. However, the large splash is very harmful, because the splash destroys the plastic ring around the solder joint, reducing the strength and plasticity of the joint; the splash is accompanied by shrinkage and crack, which affects the dynamic load strength of the joint; The surface of the weld affects the surface quality and corrosion resistance, so excessive splashing should be avoided.
4. Weld joint strength
The strength of the weld joint is another important indicator of joint quality. In production, the ratio of the shear strength of the commonly used seam welded joint to the tensile strength (too close) of the base metal (the same batch) is expressed. It is generally stated that the ratio should be greater than 75% or 85%. For materials with good welding performance, the thickness of the weld zone is less than 2.0mm, the ratio is required to be ≥85%; for materials with poor weldability or thickness greater than 2.0mm, the ratio is required to be ≥75%.
The shear strength test piece of the welded joint is shown in Fig. 2.
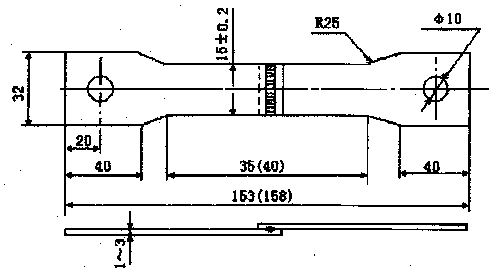
Figure 2 Seam welded joint shear strength test piece
5. Seam welder stability identification
The production practice over the years has proved that the stability of the seam welder directly affects the quality of welding, and this issue has been increasingly paid attention to at home and abroad. Stability evaluation of the seam welder is a powerful measure to ensure the quality of seam welding in steel drums. The seam welder is required to perform the stability evaluation of the welder after installation and overhaul, or after the control system is changed. Steel drums can only be welded after passing the qualification.
The identification items and requirements are shown in Table 3.
Table 3 Seam welder stability identification items and requirements
Transverse 3 Weld width should be greater than Table 2, penetration rate is in the range of 20-80%, indentation depth is less than 15% 5 is greater than 85% of base metal strength. Level 3 (ibid.) Vertical 1
Horizontal 2 (ibid.) 5 is greater than 80% of the strength of the base metal
Second, the quality control of steel barrel seam welding
Steel drum welding quality control technology is a new development part of the electric resistance welding discipline. It makes the welding quality stable and reliable. Therefore, the control technology of steel drum welding quality has received increasing attention at home and abroad.
The quality control of resistance welding was raised as early as the 1940s, but the real development and production for nearly 20 years, due to the development and wide application of microelectronics and computer technology, the technology has reached a practical level. This technology has been used in the steel drum manufacturing industry for nearly a decade, and it has not been widely used in China so far.
Resistance welding quality control technology belongs to the quality control in the welding process, which basically includes two aspects: real-time stable control of welding parameters and control of the physical quantity reflecting the welding point state in the welding process. The former such as constant current monitoring, voltage monitoring, energy monitoring, etc.; the latter such as electrode displacement control, ultrasonic monitoring, acoustic emission monitoring. In most monitoring technologies, microprocessors are used to improve the computing speed and control accuracy, and can be connected with the central computer to integrate quality monitoring with enterprise production management.
1. Constant current monitoring technology
1 monitoring principle
The so-called constant current monitoring technology refers to a quality monitoring technology in which the effective value of the welding current is constant during the resistance welding process to ensure that the heat generated in the welding zone is substantially unchanged, thereby obtaining a stable weld nugget size.
Tunburg law, the heat generated by the welding current
![]() ...(3)
...(3)
Where i is the instantaneous current value (A) flowing through the weldment;
R——the total resistance (Q) of the weld zone between the two electrodes;
T——time (S) at which the welding current passes.
If under the same welding production conditions, (t also does not change), it can be approximated that R is constant, then Q depends only on iw and has a square proportional relationship. In order to keep the welding current constant, it is necessary to calculate the current effective value of each half wave according to the change of the load impedance of the welder circuit and the change of the power supply voltage, and compare with the set current value, and adjust the welder main according to the difference of the comparison. The firing angle of the thyristor in the power circuit keeps the welding current constant. When the production conditions are relatively stable, the welding current is controlled to be constant, and the size of the weld nugget core can be controlled.
2 control instruments and methods
Constant current monitoring is a closed loop system. The system block diagram is shown in Figure 3. The current sensor is sampled from the secondary circuit of the welding transformer, and the signal is recovered by integration, and after precision rectification, it is sent to the analog-to-digital converter. Each half wave is subjected to n (generally n ≤ 50) analog-to-digital conversion. And read into the CPU. The effective value of the half-wave current is obtained in the CPU, and then compared with the set current, and the heat of the next week is calculated. According to the table of the relationship between the heat of the memory and the firing angle, the trigger angle to be controlled by the next wave is detected to drive the thyristor. The constant current meter has a fast response speed, simple operation and low cost.
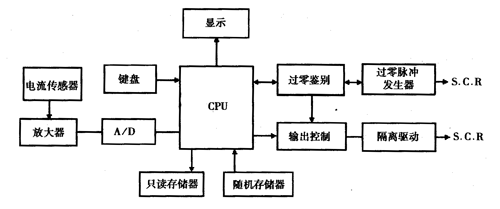
Figure 3 Constant current monitor system block diagram
Since the constant current monitor uses a microprocessor, it can calculate the effective value of the welding current and accurately control the trigger angle of the thyristor. Constant current control accuracy can reach 2%.
The galvanostat monitor only controls the welding current parameters and is consistent with the current setpoint. Therefore, choosing the right current setting value is the key to this monitoring method. The current setpoint should be selected in combination with the steel drum structure, material properties and production conditions through multiple process tests and matched to weld time, electrode pressure and electrode diameter. Only in this way can we achieve satisfactory monitoring results.
Constant current control is characterized by stable solder joint nugget size when supply voltage fluctuations and welder loop impedance changes. When the power supply voltage varies between 300 and 450V, the galvanostat can maintain the welding current unchanged, ensuring that the weld nugget base is unchanged; if there is no constant current control, the welding current increases with the voltage, and the size of the nugget changes greatly. .
2. Energy monitoring technology
1 monitoring principle
The principle of energy monitoring is based on the fact that the Joule heat in the weld zone is the only heat source that melts the metal and forms the weld. When the production conditions are certain, it can be assumed that the heat dissipation of the solder joints is basically the same; at this time, the more heat released from the solder joints, the larger the nugget of the formed solder joints. Therefore, the heat of the weld zone is used as the judgment of the size of the weld nugget.
The heat released from the weld zone is:
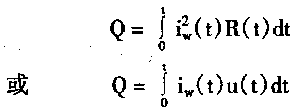 ...... (4)
Where Q is the heat (J);
Iw——the instantaneous current value (A) passing through the weld zone;
R——the total resistance (Q) between the two electrodes;
U - the voltage between the two electrodes (V);
t - the time (s) through which the current is passed.
2 monitoring instruments and methods
The energy monitor is designed and manufactured according to equation (4). It consists of a current sensor, an integrator, a voltage transmission line and an absolute value circuit, a multiplier or squarer, a Vf converter, a shaping circuit, a counter, a display, and a timing circuit. Figure 4 is a functional block diagram of the energy monitor.
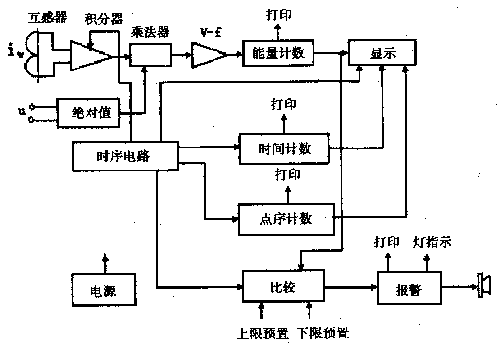
Figure 4 Functional block diagram of the energy monitor
The monitoring technology has two monitoring modes: in the case where the current factor is variable and the resistance is not easy to change, the method of /i:dt can be selected; in the case where the electrode pressure is variable and there is a shunt, the mode of Ji-wudt can be selected.
Before the monitoring, the process test should be carried out. Combined with the steel drum structure and production conditions, a reasonable energy count control range should be selected. Any solder joint beyond the control range should be suspected of its quality.
boys backpack
Mianyang Crossing Cross-Border E-Commerce Co., Ltd. , https://www.wycypets.com